You were about to toss those weathered boards piled behind the shed. Yet those old garden planks can become a raised vegetable bed that costs almost nothing. In 2026, this rustic upcycling trick is winning over thrifty gardeners everywhere.
Why salvaged wood deserves a second life in your garden
Every spring, many homeowners sort through stacks of leftover lumber. Fence panels, decking offcuts and pallet boards often end up at the tip. However, most of this wood still has years of use left. Throwing it away means wasting a free building resource.
Reusing timber you already own keeps costs near zero. A store-bought raised planter can run between €50 and €150, depending on size. By contrast, a homemade version built from reclaimed boards requires only a handful of screws and a bit of elbow grease. The savings are hard to ignore.
Beyond the budget angle, there is a real charm to a rustic planter. Aged wood carries a patina that new timber simply cannot match. As a result, your vegetable patch gains character while staying practical. Neighbours often ask where you bought it — the answer is always the same: nowhere.
« A raised bed made from salvaged planks is proof that the best garden projects start with what you already have. »
Checking your boards before you build
Not every plank is safe for growing food. First, make sure the wood has not been treated with toxic preservatives such as CCA (chromated copper arsenate). Untreated softwood, heat-treated pallet wood stamped HT, or naturally rot-resistant species like larch are all good choices. When in doubt, sand the surface and line the inside with food-safe landscape fabric.
To readCurtains: This Simple Change in Your Living Room Can Stop Up to 30% of Heat Loss This WinterNext, inspect each board for deep rot or heavy insect damage. Small cracks and surface weathering are fine — they add to the look. Still, a plank that crumbles under thumb pressure will not hold soil for long. Set those pieces aside for kindling instead. Sorting old garden planks carefully at this stage saves frustration later.
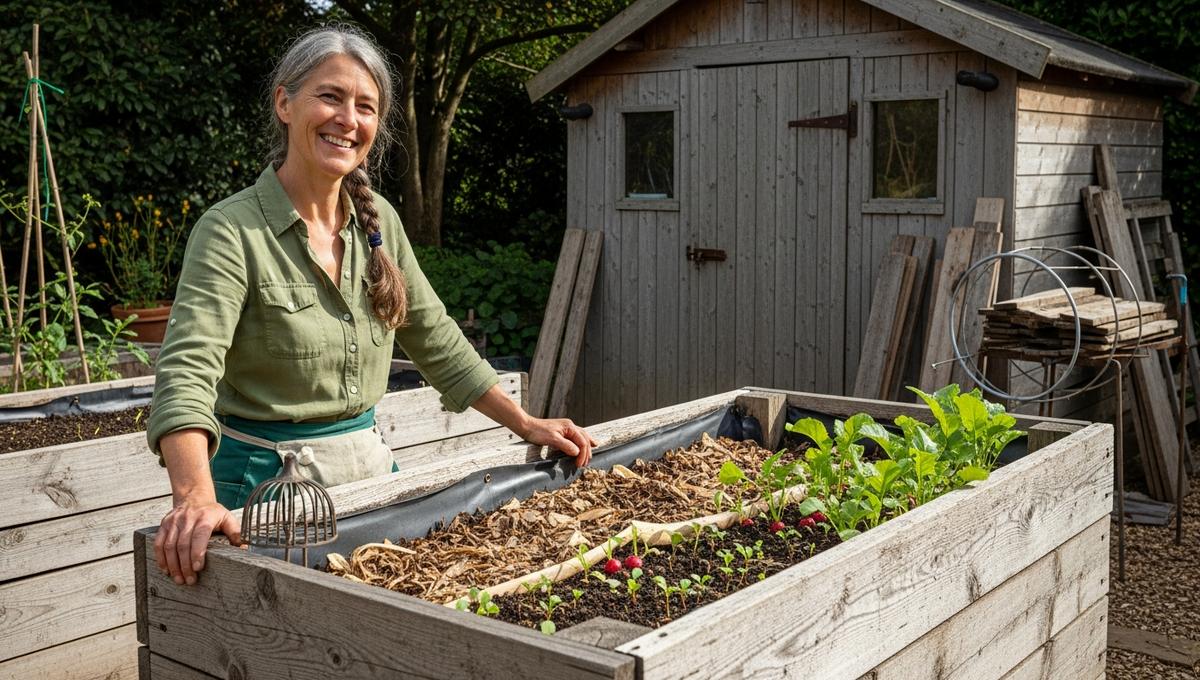
Step-by-step: building your raised bed from reclaimed boards
The most popular format is a simple rectangle, roughly 120 × 60 cm and about 40 cm tall. This size is easy to reach across from both sides. It also fits neatly on a patio, a balcony corner or a small lawn. You can adjust the dimensions to match the planks you have on hand.
Start by cutting four corner posts from thicker timber — around 7 × 7 cm sections work well. Then screw horizontal boards to these posts, stacking them until you reach the desired height. For fixings, 4 × 50 mm screws are ideal for attaching thinner side panels to the corner posts, as they grip firmly without splitting the aged wood.
Use 4 × 50 mm screws at regular intervals along each board to keep the structure rigid once the bed is filled with heavy, damp soil. Pre-drilling pilot holes is a wise step on older timber, because it prevents cracking along the grain.
- Untreated or HT-stamped planks — free from your own stock
- Four corner posts (reclaimed fence posts work perfectly)
- A box of stainless-steel or coated screws (4 × 50 mm recommended)
- Landscape fabric to line the inner walls
- A drill, a saw and a tape measure
Once the frame is built, staple landscape fabric along the inside. This barrier stops soil from washing out through gaps while still allowing drainage. After that, place the bed in its final spot — moving it later will be tough once filled. Level the ground beneath it so water drains evenly.
Filling the bed for healthy crops
A proven method called lasagna layering turns garden waste into rich growing medium. Start with coarse branches and twigs at the bottom. Then alternate layers of brown material (dry leaves, cardboard) with green material (grass clippings, kitchen scraps). Top everything off with about 15 cm of quality compost mixed with garden soil.
This layered approach feeds plants for months as the organic matter breaks down. Consequently, you need less fertiliser throughout the season. Herbs, salad greens, radishes and strawberries all thrive in a raised setup like this. The improved drainage also discourages root rot, which is a common issue in heavy ground-level soil.
Watering is simpler too. Because the bed is elevated, moisture reaches roots quickly without puddling on the surface. For even less effort, lay a drip-irrigation line along the top before you mulch. In hot weeks, this small addition can cut watering time in half.
Making the most of old garden planks in 2026
Interest in low-cost, eco-friendly gardening continues to grow in 2026. Social media is full of before-and-after photos showing old garden planks transformed into productive vegetable beds. The trend fits perfectly with the broader move toward reducing waste at home. Rather than buying new materials, resourceful growers shop in their own back gardens first.
Durability is a fair concern. Untreated softwood exposed to damp soil may last only three to five years. Yet that lifespan is perfectly acceptable for a free structure. When a board finally gives out, simply unscrew it and slot in another reclaimed plank. This modular approach means the bed evolves over time instead of heading to landfill in one piece.
To readYour Fridge Uses Too Much Energy: This Common Storage Mistake Blocks Cold Air From CirculatingAesthetics can be enhanced with minimal effort. A light sanding followed by a coat of linseed oil brings out the wood grain and adds a layer of weather protection. Some gardeners even mix plank widths and tones on purpose, creating a patchwork effect that looks deliberately rustic. The result is a feature piece, not an eyesore.
So before your next trip to the recycling centre, take a closer look at those forgotten old garden planks leaning against the fence. With a few screws, an afternoon of work and a little creativity, they can become the most productive corner of your outdoor space. The materials are waiting — all they need is a new purpose.
Crédit photo © DivertissonsNous