Hanging a heavy shelf or a large mirror can quickly turn into a nightmare when the anchor spins freely inside the wall. Many handymen have faced this exact frustration, yet a surprisingly simple technique can solve the problem for good. This method relies on everyday materials and takes only a few extra minutes.
Why standard wall anchors often fail
Most people drill a hole, push the anchor in, and hope for the best. However, the real issue starts when the hole is slightly too wide for the plug. In older homes, plaster tends to crumble, and the cavity grows larger than planned. As a result, the anchor never grips the wall properly.
Drywall presents its own challenges. The material is soft and brittle, so even a small vibration can loosen a poorly seated plug. Furthermore, humidity in bathrooms or kitchens weakens the surrounding area over time. That slow decay explains why towel racks and cabinets eventually pull away from the wall.
Experienced handymen know that the wall type matters just as much as the anchor type. A solid brick wall, a hollow partition, and a concrete surface each demand a different approach. Ignoring this basic rule is the number-one reason anchors fail across households everywhere.
« A wall anchor is only as strong as the contact between the plug and the material around it — improve that contact, and you solve ninety percent of the problem. »
The role of wall composition in anchor strength
Solid walls made of brick or concrete offer excellent grip once you use the right drill bit size. In contrast, hollow walls such as plasterboard need special expanding anchors that spread behind the panel. Choosing the wrong anchor for your wall type almost guarantees a weak hold.
To readHydrangeas covered in blooms this spring start with one simple winter pruning stepOlder buildings often have mixed construction, with plaster over brick or lath layers. This means a single wall can behave differently at various points. Therefore, testing the surface with a small pilot hole before committing to a full-size drill is a wise first step.
The overlooked technique that makes anchors hold tight
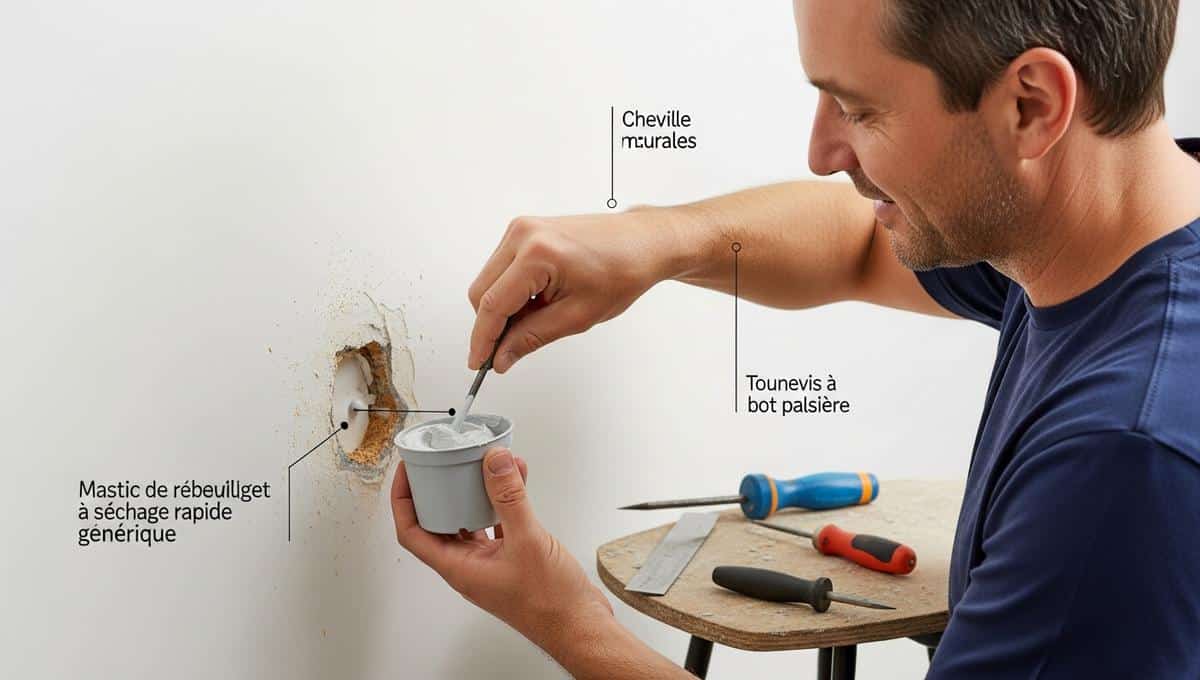
The trick is deceptively simple: before inserting the wall plug, apply a thin layer of quick-setting plaster or filler inside the drilled hole. Then push the anchor into the wet paste and let it cure for at least thirty minutes. This creates a custom-moulded seat that eliminates any gap between the plug and the wall.
By filling micro-cracks and irregular edges, the filler bonds the anchor to the surrounding material. The result is a hold that can support significantly more weight than a dry-fit plug alone. Many DIY enthusiasts report that shelves they once re-fixed every few months now stay firm for years.
Some skilled home repair professionals take this a step further. They lightly score the inside of the hole with a screwdriver before applying the paste. Those small grooves give the filler extra surface area to cling to, which boosts the final strength even more.
- Quick-setting plaster or all-purpose filler — the bonding agent that fills gaps
- A correctly sized drill bit — matched to the anchor diameter
- A pilot hole test — to identify wall composition before drilling
- A scoring tool — a flat screwdriver works to roughen the hole interior
- Patience — at least thirty minutes of curing time before driving the screw
When to use this method and when to skip it
This filler technique works best on solid or semi-solid walls where the hole has become slightly oversized. It is also ideal for reusing an old anchor point without drilling a brand-new hole nearby. For these common scenarios, handymen across online forums call it a genuine game-changer.
On the other hand, if you are working with a completely hollow partition, a mechanical solution may be more appropriate. Toggle bolts or spring-loaded anchors grip the back of the panel and do not rely on friction alone. In such cases, adding filler inside the cavity would serve little purpose.
Fischer and Molly-style wall anchors offer yet another reliable option, especially for hollow walls. Available in classic, self-piercing, and self-drilling variants, these expanding anchors open behind the plasterboard to distribute weight over a wider area.
Practical tips handymen use to get it right every time
First, always match the drill bit to the anchor packaging instructions. A 6 mm plug needs a 6 mm bit, not a 7 mm one. Even a single millimetre of extra clearance reduces holding power dramatically. Precision at this stage prevents most failures.
Next, clear dust from the hole with a quick blast of air or a small vacuum nozzle. Dust acts as a barrier between the plug and the wall, much like sand under a tile. Removing it ensures direct contact and a stronger mechanical bond.
To readOutdoor materials that age badly and waste your money: 5 to avoid in 2026After that, insert the plug slowly and firmly by hand rather than hammering it in. Hammering can crack the edges of the hole, especially in plaster or lightweight block. A gentle push preserves the wall structure and keeps the fit snug.
Finally, avoid over-tightening the screw once everything is in place. Turning the screw past the point of resistance can spin the anchor and undo all your careful preparation. Handymen with decades of practice often say that the last quarter-turn is the one that causes the most damage.
With this straightforward approach, even a first-time DIY enthusiast can achieve results that rival those of seasoned handymen. The technique costs almost nothing, requires no specialist tools, and works on the vast majority of wall types found in homes built across different eras. Sharing these small but effective tricks is precisely what keeps the community of home repair lovers growing stronger each year in 2026.
Crédit photo © DivertissonsNous